The theme was Maker Fun Factory — getting creative with gears, robots and rockets as kids learn they are Created by God and Built for a Purpose. As I did every year prior, as soon as the theme is chosen, I begin mapping out designs, projects that need to be undertaken, and items I need to purchase. I honestly don't buy a ton from the VBS supplier, but I do watch the decorating videos for all the DIY ideas and building tips.
Working in the design industry, I've had access to onsite large output printers, and with the blessing of company leadership, have been gifted unlimited printing and supplies. Using both the supplier-provided images and ones I find online, much of the set design is printed out and mounted to foam core. With the vastness of the interiors I have to decorate, large scale is best, filling the space to the fullest and creating a dramatic experience for the kids.
Directly when you enter the sanctuary, I had a factory whistle, printed out on a large-output printer and mounted to foam core. The smoke is polyester fiber fill. I pushed it onto a piece of white wire and inserted the end into the whistle mouth.


My church is really wonderful about letting me take over the sanctuary, and the altar area becomes center stage for the theme to come to life. I utilize a lot of the 4'x8' 2"-thick pieces of insulation foam to construct most of the set. It's so easy to work with (despite the large size), and results in giant pieces that weigh very little. Also very easy to paint and piece together (using Great Stuff and/or 4" nails).
The altar area walls are wood panels with molding, and the look reminded me of a gentleman's library, so I decided that my Maker Fun Factory would be less modern and more Victorian. This decision didn't lead to the most colorful of my past years' sets, but I liked how it felt Harry Potter-esque.

This bookshelf, crafted from foam board, became a great catch-all for a lot of the smaller props I'd purchased (online specialty stores, Amazon, thrift stores, Dollar Tree, etc.).
The animals that Group (this year's VBS supplier) has as part of the theme — I buy the large posters, mount them to foamcore, and trim each out, and use them around the set. The beakers, test tubes and flasks were all online purchases. The plastic toy airplane, text/medical books, clock in a cloche, laboratory wash bottle, and microscope were all cheap thrift store finds.

The oxygen tanks were a fun DIY project. Two liter soda bottles, spray painted gray and secured together with black electrical tape. The letters are stenciled on, the tubing was something I found at home, and the gauge is from Home Depot.


I glued a Maker Fun Factory logo on a hard hat.

A church table next to the shelf holds a computer monitor on which I glued a hi-tech-looking computer image. And the old phone was one my office was throwing away.

I had wanted to make an atom I'd seen on Pinterest using hula hoops and balls or balloons, but I couldn't get the balls to center within the hula hoops, so it's sans a nucleus. Some projects don't work out :-( . All that aside, the hula hoop assembly was very easy. I used zip ties to attach them, one to the other.

On each side of the altar, in the doorways, I hung clear heavy-duty shower curtains that I had cut into strips (leaving the top edge intact). Before I cut them, I glued on the caution sign. For the garbage can, I glued on the danger sign, and created the oozing toxic waste using Great Foam, spray painting it day-glo yellow. The giant paintbrushes were just a fun afterthought. They are made by taking broom and pushing the handle down into a pool noodle. The "metal" case around the "bristles" is made using metallic silver duct tape.

The wall is the 2" foam board, with bricks cut from foam board, painted, and glued on. I found the dart board at Goodwill. It didn't have the darts, so I made those by printing out dart images and inserting straight pins to attach them to the board.

I bought a lab coat at a thrift store and added safety goggles, pocket protector and pens, and a Mad Scientist I.D. badge.

For the individual camper pictures, I bought a variety of sizes of lab coats from Amazon, a bunch of stick-on mustaches from Dollar Tree, and a single Erlenmeyer Flask. The pictures turned out very cute, with each camper looking like a little scientist.
For the altar area, I utilized the wooden altar as a table. And I took advantage of the area between the two Gothic-arched doorways (and the stairstep shelf area on each) to bridge a shelf. I made the shelf out of a piece of the 2" foam, and created two brackets from the same material.
On the shelf is a vignette of items, all printed out, mounted to foam core and easel-backed. They look quite three-dimensional.
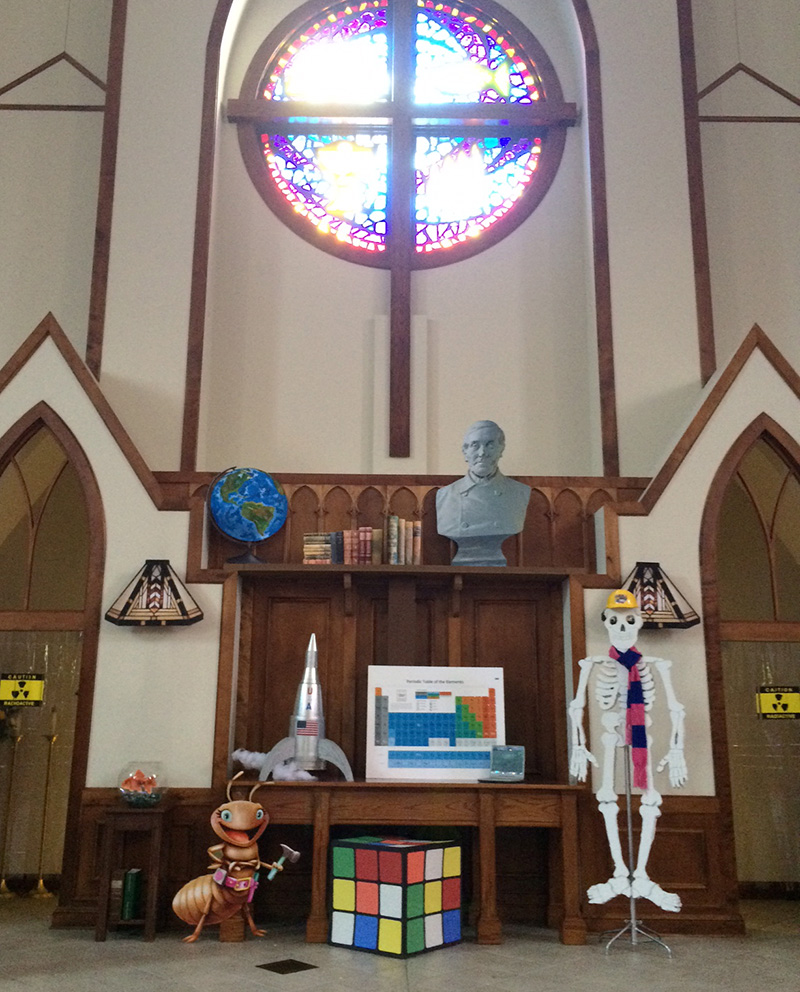


I wanted to hide the sconces, so I printed out Tiffany shades and hung them on the existing fixtures using wire.

The giant Rubik's Cube was an easy under-an-hour project that came together using a giant square box, black paint, and squares with rounded corners cut out of cheap construction paper.

I traced the skeleton by creating a transparency (from clip art), then projecting the image onto a sheet of the 2" foam board using an overhead projector. I cut him out with a hot knife, then painted him white, added googly eyes, a hard hat and a Harry Potter scarf. I found the metal "stand" at Goodwill; have no idea what it was originally intended for, but it worked great as a stand for the skeleton (with some rigging on the back).

I printed out an element chart and mounted it to foamcore. The little laptop was a Goodwill find; I just printed out a scientific looking screen that I glued on.

I crafted the rocket out of random buckets and cans, made the legs out of foam board and the smoke from batting, spray painted the whole thing silver and slapped on a sticker of an American flag and painted on the U.S.A. letters.

For the fish bowl, I printed out a realistic looking fish (but giant in size), and glued him onto a clear piece of rectangular acetate (the width of the mouth of the bowl). Then I just shoved the acetate down into the glass pebbles in the bottom.


The church has a large rolling set of stairs that I thought would be perfect to create the feel of a large library with those rolling ladders to get to uppermost bookshelves. I covered the side with the foam board, added a round temperature gauge, and made a cat to sit on the top step. There is a string of lights that the Pastor used as part of the daily assembly — a bulb was added each day — and I strung them up the handrail, and he was able to climb the stairs to add each bulb. I found the telescope for $5 at a local thrift store.


I made the drafting table free-form and used a hot knife to add texture then painted it using light and dark brown paints, added a lamp and fun pictures. The stool was one my old office was throwing away; the seat was broken in half, so I glued it and then painted it gray to hide the mend.

The file cabinet was a church throwaway, so I rescued it, spray painted it gray and added Great Foam toxic goo oozing out of a drawer. Also had a file peeking out of a drawer, and made two specimen jars.


Along the walls of the sanctuary we have sound panels which are perfect for mounting items — easy to push T pins into, sort of like a cork board. We made gears from silver paper, old hub caps and random metal finds.

I also incorporated some of the VBS animal characters into the various vignettes.


For the pew markers (designating where each camper group needs to sit during assembly), I constructed these paint cans to look like they are spilling out paint. The base is a styrofoam disk cut in half, the flat side against the pew. I put a yardstick into each piece of foam and then draped a plastic tablecloth over the yardstick, gathering it at the top using a rubberband and securing it at the bottom with T-pins pushed through the cloth and into the bottom of the foam. I then hot glued the inside bottom of the bucket and put it upside down onto the yardstick. The bucket is held to the pew with velcro (a piece on the bucket, and one on the pew). I glued an animal on each bucket.


The windows at the back of sanctuary which look into the narthex are always an opportunity to showcase the theme. This year I wanted to create the look of laboratory shelves with all the glassware filled with liquids. It was a huge effort, and undertaken by one of my volunteers with the patience of Job and a positive attitude to match.
The test tube stands are cut from wood-looking contact paper. The labware is cut from clear acetate, and the "liquids" are cut from colored acetate file folders I found at Dollar Tree. The "shelves" are just white electrical tape. Everything not already sticky is adhered by running it through a Xyron machine.


The test tube stands are cut from wood-looking contact paper. The labware is cut from clear acetate, and the "liquids" are cut from colored acetate file folders I found at Dollar Tree. The "shelves" are just white electrical tape. Everything not already sticky is adhered by running it through a Xyron machine.


I had a teen boy volunteer who was happy to take on my robot project. He used a wooden freestanding column as the base, and duck taped silver paper around it (found a secondary duck tape that looks like diamond plate metal). The arms are dryer vent ducting, and the mechanical hands I found at a thrift store; I spray painted them silver. The face is a coffee filter from an industrial coffee machine. The nose is the machine's spout.
The hand scanner is made using a plastic gallon bag filled with Dippity Do (hair gel) that is sandwiched between a piece of cardboard and a frame. My volunteer added a keyboard for the kids to tap away on, and even made a socket!


The hand scanner is made using a plastic gallon bag filled with Dippity Do (hair gel) that is sandwiched between a piece of cardboard and a frame. My volunteer added a keyboard for the kids to tap away on, and even made a socket!


One of the skits needed a tomb, so this was made with three painted sheets of foam as the base, and then foam pieces cut for the facade and rolling boulder. Covered the top with black cloth, and added plants and foam rocks.


I had a ton of those loom loops from when my daughter was little, so I made this art board using cardboard and thumbtacks (glued into the cardboard). A fun diversion for quieter time.

Am happy to answer any questions! Just leave me a comment and include an email so I can reach you.